Load Balancers
Deploy an application or service by adding an IP address and exposing ports with Load Balancers.
Route traffic to one or more instances
Create listeners to handle connection requests
Expose an application to other users or applications
Enable health checks
Prerequisites
Running instance or defined labels
Create Load Balancer
In the console main menu, click Compute -> Load Balancers.
Click Launch Load Balancer.

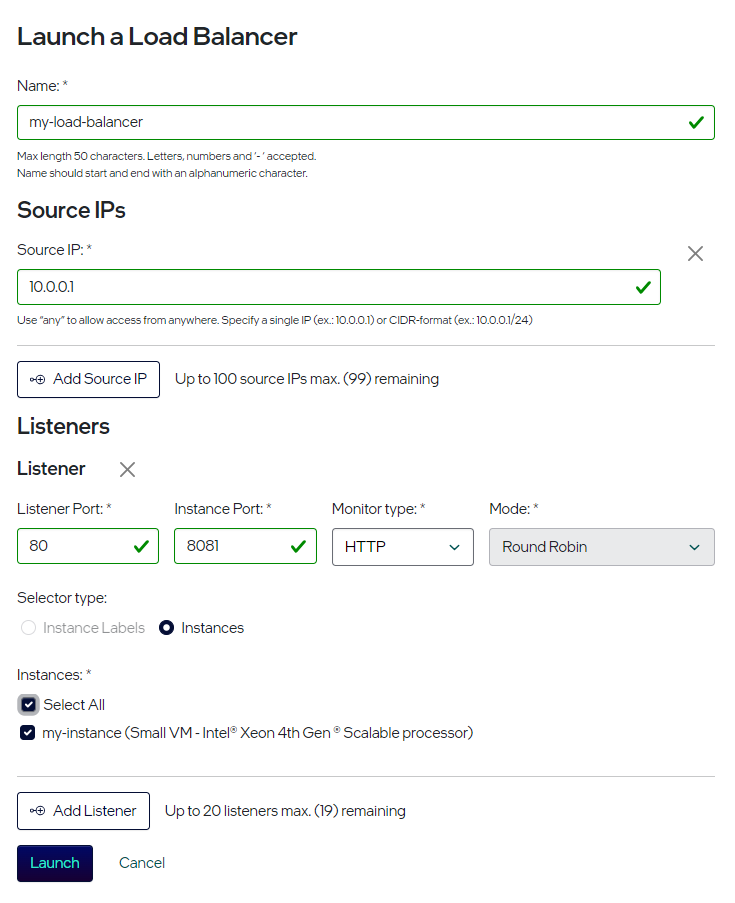
Launch a Load Balancer - Input Form
In Name, enter a name using a combination of letters, numbers, or dashes, all lowercase.
In Source IPs, enter one of the following: any; IP address(es); or CIDR-format subnet(s). This restricts which public IPs are allowed to access the Load Balancer.
Caution
Be careful. Using any means no restriction applies, and anyone on the Internet can route to it.
Optional: Click Add Source IP to add more.
Complete subsections to launch a load balancer.
Listeners
Enter Listener data using the example below. Your configuration may differ.
Listener Port. We enter 80.
Instance Port. We enter 8081.
Monitor Type. We enter HTTPS. Click Monitor Type for more information.
Tip
Click Listeners Reference for more information.
Selector Type
Choose one:
Instance Labels - You define key/value pairs, which later are applied to an instance
Instances - You must already have one or more instance(s) available
Instances
Choose one or more items to which the Load Balancer applies.
Select All
my-instance
Optional - Add New Listener
In this example, we create an additional listener for the same instance. The example shows how to do an HTTP redirect from Port 80 to Port 443, ensuring a TLS connection.
Add Listener
Click Add Listener.
Let’s add another Listener Port, Instance Port, and Monitor Type as follows:
Listener Port - 443
Instance Port - 8443
Monitor Type - HTTPS
Instances
Choose one or more items to which the Load Balancer applies.
Replace my-instance with your instance name.
Select All
my-instance
Finally, click Launch.
In the Compute dashboard, wait until the State shows Active for your Load Balancer.
The following tasks are optional. They represent limited steps you might perform.
Validate Load Balancer
To check the health of your instance/application, test your Load Balancer using curl.
Tip
Ensure that the Load Balancer is Active.
Navigate to Compute --> Load Balancer.
Choose the load balancer that you created in the previous steps.
In the Details tab, copy the Virtual IP address.
Run the command below, pasting your own Virtual IP, followed by the port number defined earlier.
Create a curl command, following an example below. Replace the URL with your Virtual IP address.
curl http://10.152.227.65curl https://10.152.227.65:443
Edit Load Balancer
For an existing Load Balancer, you can edit instances that receive traffic.
Create a new instance.
Navigate to Compute --> Load Balancer.
Choose the load balancer that you created in the previous steps.
Look for the new instance under Instances.
Select the new instance name, or choose Select All.
Optionally, you can deselect the instance to which the Load Balancer applies.
click Save to update the Load Balancer.
Delete Load Balancer
Navigate to Compute --> Load Balancer.
Find the Name of the Load Balancer you wish to remove.
Under Actions, click Delete.
Confirm delete.
Listeners Reference
Each listener routes a request from a client to instance(s) using the port and protocol that you configure. A listener must include:
Listener Port - Public port that is exposed to the Internet
Instance Port - Internal port that is exposed on your instance
Monitor Type - Health check for an application or service. See table below.
Mode - Load-balancing algorithm (e.g., Round Robin)
Monitor Type
Protocol |
Description |
|---|---|
TCP |
A simple service port check |
HTTP |
A request that expects an HTTP response of “200” or OK |
HTTPS |
A secure request that expects an HTTP response of “200” or OK |