Gaudi2 Deep Learning Server
Explore the benefits of using the Gaudi2® Deep Learning Server for training a simple PyTorch* model and more. In contrast to the 1st generation Habana® Gaudi® processor, the Habana Gaudi2® processor:
Boosts the number of Tensor Processor Core (TPCs) clusters from 8 to 24
Adds support for the FP8 data format
Offers integrated media control
Features 7nm versus 16nm process technology
Note
The Habana Gaudi2 processor processes data in FP32, TF32, BF16, FP16 and FP8 formats.
Compute Instance
Instance type |
Processor |
Cores |
RAM |
Disk |
|---|---|---|---|---|
Bare Metal (BM) |
Gaudi2® Deep Learning Server featuring eight Gaudi2® HL-225H mezzanine cards with 3rd Gen Xeon® Platinum 8380 Processors |
NA |
1 TB |
30 TB |
Initial Setup
From the main console, select Hardware Catalog.

Hardware Catalog
Select the Gaudi2® Deep Learning Server.

Gaudi2 Deep Learning Server
In the instance Configuration window, enter an Instance name and select the SSH key that you created in Get Started.
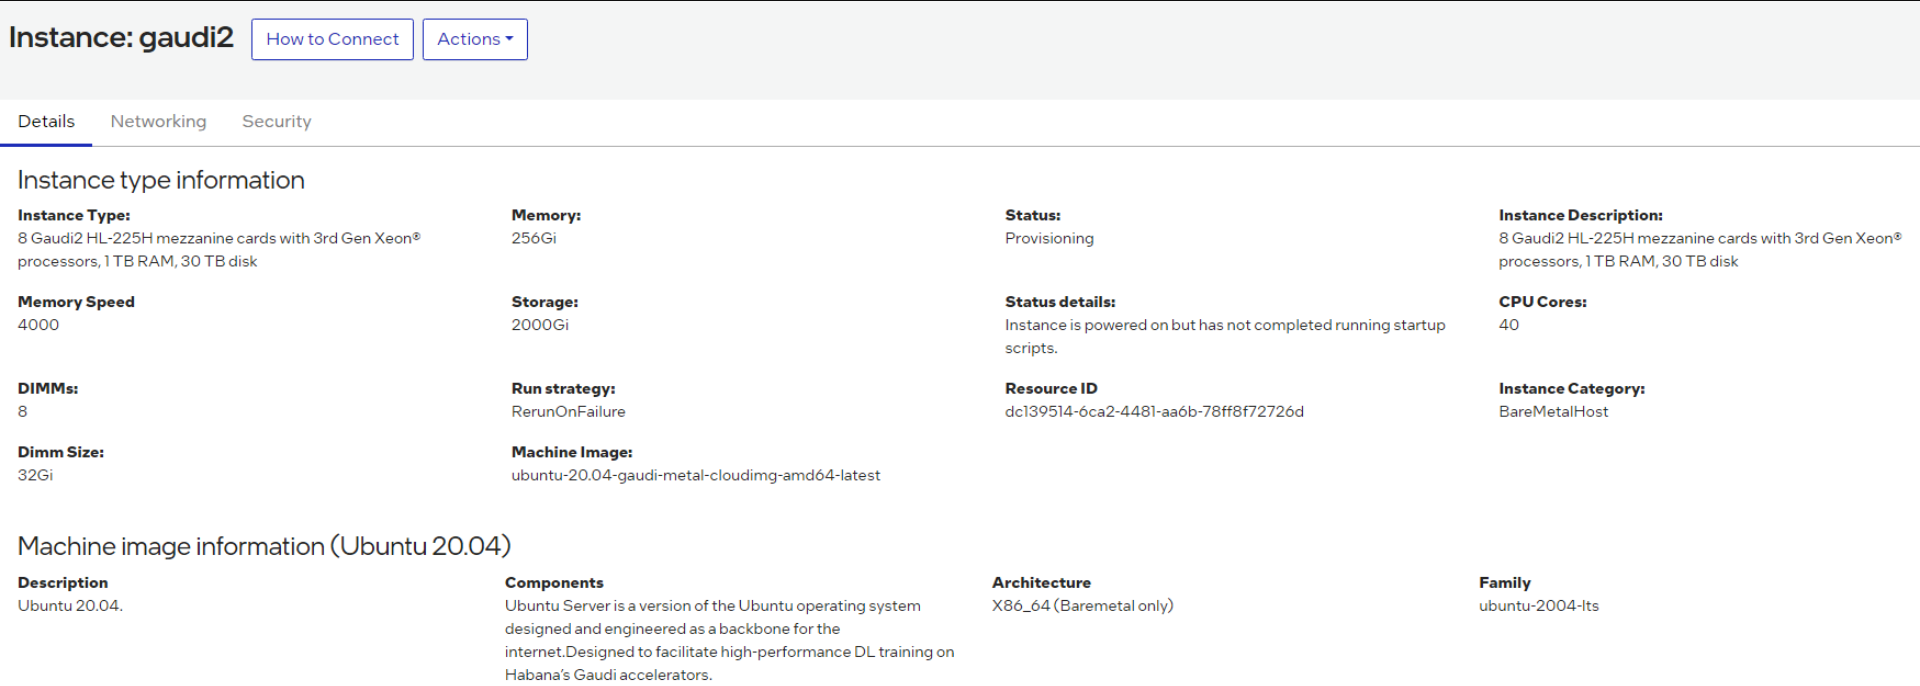
Click “Launch”. Under State, observe the node is being provisioned:

Provisioning an instance
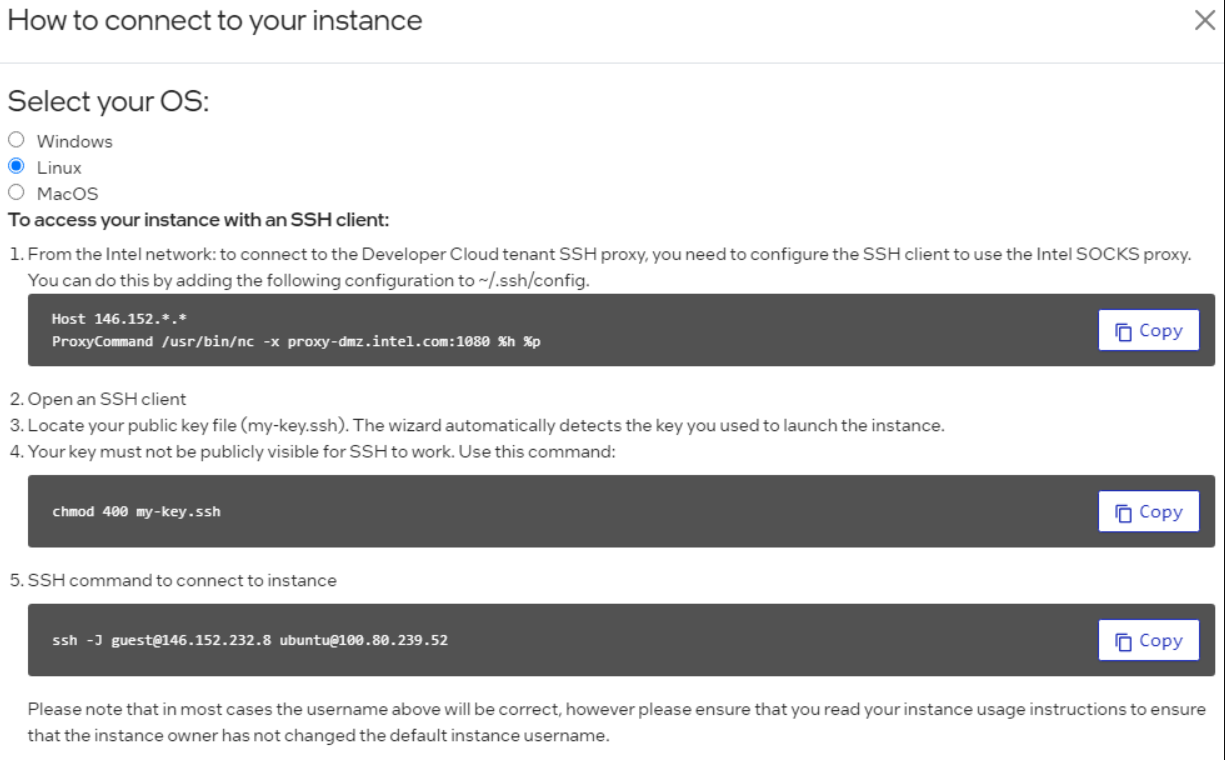
Once the State has changed from “provisioning” to “ready”, click on the instance name. Then select the “How to Connect” box:
How to Connect
You will then see all the options to SSH into the Developer Cloud instance. Copy the SSH command and paste it into your terminal window:
SSH command to connect to instance
Note
If you do not have access to the Gaudi2 instance, you will need to request access to be added to the wait list.
Start Training a PyTorch Model on Gaudi2
Run the Habana Docker image.
docker run -it --runtime=habana -e HABANA_VISIBLE_DEVICES=all -e OMPI_MCA_btl_vader_single_copy_mechanism=none --cap-add=sys_nice --net=host --ipc=host vault.habana.ai/gaudi-docker/1.12.0/ubuntu20.04/habanalabs/pytorch-installer-2.0.1:latest
Clone the Model References repository inside the container you started in the previous step.
cd ~
git clone https://github.com/HabanaAI/Model-References.git
Change directory to the
hello_worldexample.cd Model-References/PyTorch/examples/computer_vision/hello_world/
Update PYTHONPATH to include Model-References repository and set PYTHON to python executable.
export PYTHONPATH=$PYTHONPATH:/root/Model-References
export PYTHON=/usr/bin/python3.8
Training on a Single Gaudi (HPU) Device
Run training on a single HPU in BF16 with autocast enabled. This is a simple linear regression model. Copy this run command into your terminal window:
$PYTHON mnist.py --batch-size=64 --epochs=1 --lr=1.0 --gamma=0.7 --hpu --autocast
Expected output should be similar to below.
============================= HABANA PT BRIDGE CONFIGURATION ===========================
PT_HPU_LAZY_MODE = 1
PT_RECIPE_CACHE_PATH =
PT_CACHE_FOLDER_DELETE = 0
PT_HPU_RECIPE_CACHE_CONFIG =
PT_HPU_MAX_COMPOUND_OP_SIZE = 9223372036854775807
PT_HPU_LAZY_ACC_PAR_MODE = 1
PT_ HPU_ENABLE_REFINE_DYNAMIC_SHAPES = 0
---------------------------: System Configuration :---------------------------
Num CPU Cores : 160
CPU RAM       : 1056446944 KB
------------------------------------------------------------------------------
Train Epoch: 1 [0/60000.0 (0%)] Loss: 2.296875
Train Epoch: 1 [640/60000.0 (1%)]       Loss: 1.546875
***
Train Epoch: 1 [58880/60000.0 (98%)]    Loss: 0.020264
Train Epoch: 1 [59520/60000.0 (99%)]    Loss: 0.001488

Total test set: 10000, number of workers: 1
* Average Acc 98.620 Average loss 0.043
Distributed Training on 8 Gaudis (HPUs)
Run training on the same model using all eight HPUs. Copy this run command into your terminal window:
mpirun -n 8 --bind-to core --map-by slot:PE=6 \
      --rank-by core --report-bindings \
      --allow-run-as-root \
      $PYTHON mnist.py \
      --batch-size=64 --epochs=1 \
      --lr=1.0 --gamma=0.7 \
      --hpu --autocast
This is a part of the expected output:
| distributed init (rank 0): env://
| distributed init (rank 3): env://
| distributed init (rank 5): env://
| distributed init (rank 6): env://
| distributed init (rank 4): env://
| distributed init (rank 7): env://
| distributed init (rank 1): env://
| distributed init (rank 2): env://
============================= HABANA PT BRIDGE CONFIGURATION ===========================
PT_HPU_LAZY_MODE = 1
PT_RECIPE_CACHE_PATH =
PT_CACHE_FOLDER_DELETE = 0
PT_HPU_RECIPE_CACHE_CONFIG =
PT_HPU_MAX_COMPOUND_OP_SIZE = 9223372036854775807
PT_HPU_LAZY_ACC_PAR_MODE = 1
PT_ HPU_ENABLE_REFINE_DYNAMIC_SHAPES = 0
---------------------------: System Configuration :---------------------------
Num CPU Cores : 160
CPU RAM       : 1056446944 KB
------------------------------------------------------------------------------
Train Epoch: 1 [0/7500.0 (0%)]  Loss: 2.296875
Train Epoch: 1 [640/7500.0 (9%)]        Loss: 1.578125
Train Epoch: 1 [1280/7500.0 (17%)]      Loss: 0.494141
***
Train Epoch: 1 [5760/7500.0 (77%)]      Loss: 0.100098
Train Epoch: 1 [6400/7500.0 (85%)]      Loss: 0.088379
Train Epoch: 1 [7040/7500.0 (94%)]      Loss: 0.067871

Total test set: 10000, number of workers: 8
* Average Acc 97.790 Average loss 0.066
Fine-tuning with Hugging Face Optimum Habana Library
The Optimum Habana library is the interface between the Hugging Face* Transformers and Diffusers libraries and Gaudi2. It provides a set of tools enabling easy model loading, training and inference on single and multi-Gaudi settings for different downstream tasks. The following example uses the text-classification task to fine-tune a BERT-Large model with the MRPC (Microsoft Research Paraphrase Corpus) dataset and also run Inference.
Note
Complete the section, Start Training a PyTorch Model on Gaudi2, before you continue.
Follow the below steps to install the Optimum Habana examples and library:
Clone the Optimum-Habana project to access the examples that are optimized on Habana:
cd ~
git clone https://github.com/huggingface/optimum-habana.git
Install habana-optimum library. This will install the latest stable release:
pip install --upgrade-strategy eager optimum[habana]
To use the DeepSpeed library on Gaudi2, install the Habana DeepSpeed fork:
pip install git+https://github.com/HabanaAI/DeepSpeed.git@1.12.0
The following example is based on Optimum-Habana Text Classification task example. Change to the text-classification directory and install the additional software requirements for this specific example:
cd ~
cd optimum-habana/examples/text-classification/
pip install -r requirements.txt
Now your system is ready to execute Fine Tuning on a BERT-Large model.
Execute Single-Card Training
Note
Complete the section, Start Training a PyTorch Model on Gaudi2, before you continue.
In the
~/optimum-habana/examples/text-classification/directory, copy and paste the following commands to your terminal window to fine-tune the BERT-Large Model on one Gaudi card:$PYTHON run_glue.py \ --model_name_or_path bert-large-uncased-whole-word-masking \ --gaudi_config_name Habana/bert-large-uncased-whole-word-masking \ --task_name mrpc \ --do_train \ --do_eval \ --per_device_train_batch_size 32 \ --learning_rate 3e-5 \ --num_train_epochs 3 \ --max_seq_length 128 \ --output_dir ./output/mrpc/ \ --use_habana \ --use_lazy_mode \ --bf16 \ --use_hpu_graphs_for_inference \ --throughput_warmup_steps 3 \ --overwrite_output_dir
The results will show both training and evaluation:
{'train_runtime': 54.8875, 'train_samples_per_second': 266.059, 'train_steps_per_second': 8.342, 'train_loss': 0.3403122169384058, 'epoch': 3.0, 'memory_allocated (GB)': 7.47, 'max_memory_allocated (GB)': 9.97, 'total_memory_available (GB)': 94.61}
100%|██████████████ 345/345 [00:54<00:00,  6.29it/s]

***** train metrics *****
epoch                       =        3.0
max_memory_allocated (GB)   =       9.97
memory_allocated (GB)       =       7.47
total_memory_available (GB) =      94.61
train_loss                  =     0.3403
train_runtime               = 0:00:54.88
train_samples               =       3668
train_samples_per_second    =    266.059
train_steps_per_second      =      8.342

***** eval metrics *****
epoch                       =        3.0
eval_accuracy               =     0.8775
eval_combined_score         =     0.8959
eval_f1                     =     0.9144
eval_loss                   =     0.4336
eval_runtime                = 0:00:01.73
eval_samples                =        408
eval_samples_per_second     =    234.571
eval_steps_per_second       =     29.321
max_memory_allocated (GB)   =       9.97
memory_allocated (GB)       =       7.47
total_memory_available (GB) =      94.61
Execute Multi-Card Training
In this example, you will be doing the same fine-tuning task on eight Gaudi2 cards.
Copy and paste the following into the terminal window
$PYTHON ../gaudi_spawn.py  --world_size 8 --use_mpi run_glue.py  \
--model_name_or_path bert-large-uncased-whole-word-masking  \
--gaudi_config_name Habana/bert-large-uncased-whole-word-masking  \
--task_name mrpc  \
--do_train  \
--do_eval  \
--per_device_train_batch_size 32  \
--per_device_eval_batch_size 8  \
--learning_rate 3e-5  \
--num_train_epochs 3   \
--max_seq_length 128  \
--output_dir /tmp/mrpc_output/  \
--use_habana   \
--use_lazy_mode   \
--bf16    \
--use_hpu_graphs_for_inference  \
--throughput_warmup_steps 3
You will see the training samples per second results are significantly faster when using all eight Gaudi2 cards:
{'train_runtime': 41.8426, 'train_samples_per_second': 1663.393, 'train_steps_per_second': 6.825, 'train_loss': 0.5247347513834636, 'epoch': 3.0, 'memory_allocated (GB)': 8.6, 'max_memory_allocated (GB)': 34.84, 'total_memory_available (GB)': 94.61}
100%|██████████| 45/45 [00:41<00:00,  1.07it/s]
***** train metrics *****
epoch                       =        3.0
max_memory_allocated (GB)   =      34.84
memory_allocated (GB)       =        8.6
total_memory_available (GB) =      94.61
train_loss                  =     0.5247
train_runtime               = 0:00:41.84
train_samples               =       3668
train_samples_per_second    =   1663.393
train_steps_per_second      =      6.825

***** eval metrics *****
epoch                       =        3.0
eval_accuracy               =     0.7623
eval_combined_score         =     0.7999
eval_f1                     =     0.8375
eval_loss                   =     0.4668
eval_runtime                = 0:00:02.06
eval_samples                =        408
eval_samples_per_second     =    198.062
eval_steps_per_second       =      3.398
max_memory_allocated (GB)   =      34.84
memory_allocated (GB)       =        8.6
total_memory_available (GB) =      94.61
Training with DeepSpeed
With the DeepSpeed package already installed, run multi-card training with DeepSpeed. Create and point to a ds_config.json file to set up the parameters of the DeepSpeed run. See the Hugging Face GitHub page and copy the configuration file example.
Once the ds_config.json file is created, copy and paste these instructions into your terminal:
$PYTHON ../gaudi_spawn.py \
--world_size 8 --use_deepspeed run_glue.py \
--model_name_or_path bert-large-uncased-whole-word-masking \
--gaudi_config_name Habana/bert-large-uncased-whole-word-masking \
--task_name mrpc \
--do_train \
--do_eval \
--per_device_train_batch_size 32 \
--per_device_eval_batch_size 8 \
--learning_rate 3e-5 \
--num_train_epochs 3 \
--max_seq_length 128 \
--output_dir /tmp/mrpc_output/ \
--use_habana \
--use_lazy_mode \
--use_hpu_graphs_for_inference \
--throughput_warmup_steps 3 \
--deepspeed /root/optimum-habana/examples/text-generation/ds_config.json
To learn more about DeepSpeed, visit the DeepSpeed User Guide for Training.
Inference Example Run
Using inference will run the same evaluation metrics (accuracy, F1 score) as shown above. This will display how well the model has performed:
cd ~/optimum-habana/examples/text-classification/
python run_glue.py --model_name_or_path bert-large-uncased-whole-word-masking \
--gaudi_config_name Habana/bert-large-uncased-whole-word-masking \
--task_name mrpc \
--do_eval \
--max_seq_length 128 \
--output_dir ./output/mrpc/ \
--use_habana \
--use_lazy_mode \
--use_hpu_graphs_for_inference
You have now run training and inference on Habana Gaudi2 using the Intel Developer Cloud.
Next Steps
Try PyTorch Model Porting to migrate other models over to Gaudi2.